Thursday, December 12, 2013

St. Finnian of Clonard

Today is my son's Name Day! What I mean by that is today is the day that the Church commemorates St. Finnian, my son's namesake. As mentioned in an earlier post, it is customary in the Orthodox Church for the newly baptized to take on the name of one whose life is worthy of emulation and to whom we can go for intercession. When I was pregnant, we were drawn to the early Church in Great Britain because of our love of the British culture and, let's face it, we are about as white as they come! Finn's due date was February 17th, which is the feast day for St. Finan of Lindesfarne. We thought the name was very unique, and that led us to St. Finnian of Clonard. We chose him because of his vocation as a teacher (which is what my husband and I were both doing for a living), and his work for the Irish people.

May God Grant You Many Years, Finnan James!! Mama loves you!


Saint Finnian or Finan

Bishop in Ireland

(† 552)

Among the primitive teachers of the Irish church the name of Saint Finnian is one of the most famous, after that of Saint Patrick. He was a native of Leinster and was instructed in the elements of Christian virtue by the disciples of Saint Patrick. Having an ardent desire to make greater progress, he went over into Wales, where he met and conversed with Saint David, Saint Gildas and Saint Cathmael, three eminent British Saints. After remaining thirty years in Britain, he returned to Ireland in about the year 520, excellently qualified by his sanctity and sacred learning to restore the spirit of religion among his countrymen. Like a loud trumpet sounding from heaven, he roused the insensibility and inactivity of the lukewarm, and softened the most hardened hearts, long immersed in worldly business and pleasures.
To propagate the work of God, Saint Finnian established several monasteries and schools, chief among which was the monastery of Clonard, which he built and which was his ordinary residence. From this school came several of the principal Saints and Doctors of Ireland: Kiaran the Younger, Columkille, Columba son of Crimthain, the two Brendans, Laserian, Canicus or Kenny, Ruadan, and others. The great monastery of Clonard was a famous seminary of sacred learning.
Saint Finnian was chosen and consecrated Bishop of Clonard. Out of love for his flock and by his zeal for their salvation, he became infirm with the infirm and wept with those that wept. He healed souls as well as the physical infirmities of those who came to him for assistance. His food was bread and herbs, his drink, water, and his bed, the ground, with a stone for his pillow. He departed to Our Lord on the 12th of December in 552.

The Lives of the Fathers, Martyrs and Principal Saints, by Rev. Alban Butler (Metropolitan Press: Baltimore, 1845), Vol. IV, October-December


 You may also be interested in:

ST.NATALIA
ST. NATALIA

2014 Budget Template


Over the course of my almost 13 year marriage, I have tried many different budgeting tools. We have used Quicken, Microsoft Money, various internet applications, and even handwriting transactions along with a calculator for each category. So far, nothing has done quite what I want it to, so I decided to create my own. Budgeting is so important for those of us who don't have disposable income, and it has become essential for my family this year since we are only on one salary. In order to be good stewards of what God has given us, it is good to be aware of how our money is spent and what our financial priorities actually are in practice. To this end, I am sharing my template in the hopes that it will be a great resource for your family, as it has been for mine. 

If you have never done a budget before and need help, let me know and I can write a post about the basics of budgeting. This file will not only help you keep to your household budget, but it will also help you to keep your bank account always balanced! What more could you ask for? 

Because each household is different, this budget is completely customizable to your own family's situation. I have included generic categories that may apply to most people, but if you have a hard time with the instructions, I would be happy to get your file set up for you! The set-up doesn't take long, and this has turned out to be a great tool for my family!

The template consists of one Excel file with 12 different sheets. each month is already there, you just have to fit it to your needs.  There are also formulas pre-written into the sheet that will do all of your calculations for you! Download the template and follow the instructions below... let's get organized for 2014!!

As always, feel free to comment with any questions, or email me if you need help with your budget template. Happy budgeting!


INSTRUCTIONS FOR SETTING UP YOUR 2014 BUDGET TEMPLATE 

1. Download the budget template and save it to your desktop. The download is from Google Drive, and the file has been converted to a Google Doc. When you open the file, click on FILE at the top of the page and go to "Download As". It gives the option to download as an Excel file, which should maintain all of the necessary formatting. 

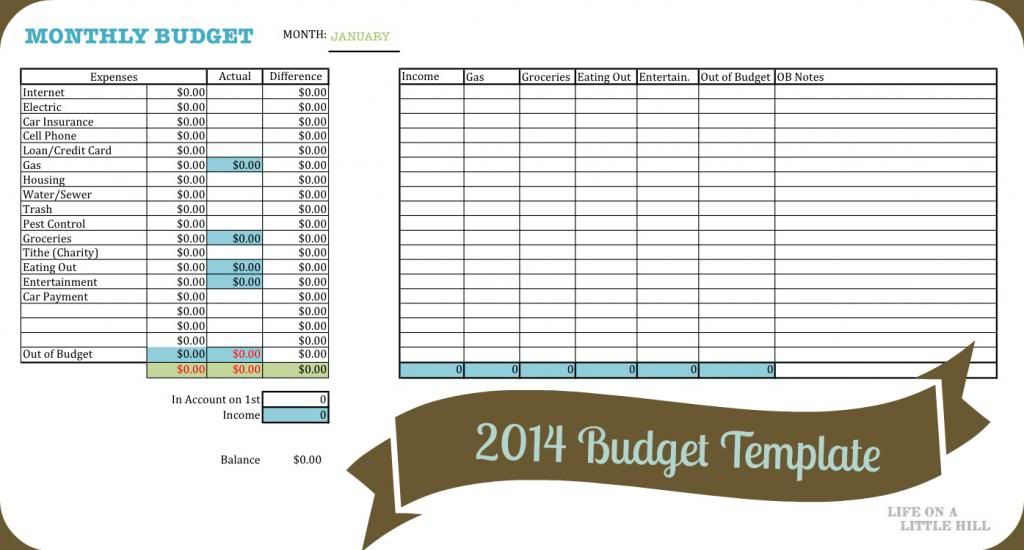
2. Once you get your budget open, take a look at the categories given. You may rename or delete any category at this time. I have also given a few blank categories in case you need more. Make sure you have all of your reoccurring expenses listed. Notice that the categories with a blue box correspond to the categories on the table to the right of the budget. These are categories that usually have more than one transaction per month (more on that in a minute). You should be able to copy and paste your categories for each month across the workbook if you wish.

3. After you have finished customizing your categories, type your budget allowance for each category in column B. Do NOT type anything in the blue box for "Out of Budget" (B22). If an expense is out of budget, you have not planned for it and it needs to be separated out. As you add your amounts, they should automatically be summed at the end of the column. When you are finished, your total budgeted expense should reflect in the green box (B23). You never need to type anything into the box 

4. The next step begins on the 1st of the month. Figure out how much is in your bank account on the first of the the month, after all transactions have cleared. Type that number into box D25. This is what allows you to have an accurate reconciliation with your budget and your bank account. 

5. From here on out, you will complete your budget as you have transactions. EVERY transaction that goes in or comes out of your bank account should be entered somewhere on the budget. For the one-time monthly expenses (rent, insurance, etc.), type the amount you spent in the appropriate box of column C. Again, the actual expenses will be tallying at the bottom of the column, so you always know where you stand. 

6. For multiple expenses (groceries, gas, entertainment, etc.), write each expense into the table to the right of the budget. Each column automatically sums at the bottom and that number is automatically entered into the corresponding category in your budget! No need to do anything but enter the transaction!! :) Do not type anything into the blue boxes at the end of the columns, or the blue boxes in the budget itself. 

7. For your income, do the same thing as in step 6. Your income will be from all budgeted sources. The transactions will sum at the end of the column and automatically be entered into the budget in box D26. The math is already done for you as far as your income and your expenditures, so if you have done everything correctly, your bank balance should be reflected in box D30 ("Balance"). As you enter transactions, the formulas make the calculations for you, and you should remain balanced. 

8. If you have transactions that are not in your budget, write them in the "Out of  Budget" category. This category will appear red in your budget because it is extra that was not planned for. There is a note section for you to mark what each transaction was for. This is a great tool because you can look through at the end of the month and see what you purchased that was out of budget. You may need to make changes to your budget for the following month... or realize a little fiscal discipline is in order!

9. If you receive money that is not normally in your budget, add it to the "Out of Budget" column, not your "Income" column. You will want to put the income number in parenthesis so it will subtract from your out of budget expenses. 

10. That's it! You can enter transactions every day or once a week, depending on your schedule and spending habits. The only trick with this budget is that you don't have a static income amount at the beginning of the month. You will want to figure out your monthly income totals and calculate them with your expenses to make sure you have a balanced budget before you enter in your budgeted expenses. If your expenses are more than your projected income, it is time to make some changes! 

Let me know if you need any help! :)
You may also be interested in:

BILL TRACKER
BILL TRACKER
WEEK AT A GLANCE
WEEK AT A GLANCE

Saturday, December 7, 2013

Best Green Bean Casserole Ever!!

This year, we had the best Thanksgiving meal yet! My hubby's dad and step-mom were here for a visit so I decided to do almost everything from scratch! I'm beginning to get a *little* more confident in my cooking, so why not do a huge meal from scratch with all completely new recipes... right??! Luckily, I had help from hubby's step-mom and a whole day of prep while the guys were hunting.

The recipe I am most excited about is the green bean casserole. I have obviously had the casserole in the past, but it has never been my favorite. I don't love canned green beans, and it seemed to always be more of a mushy mess by the time it was done. This recipe (from Pinterest) calls for NO cans whatsoever, and even includes home-made fried onion topping!! There are many steps, and it takes a bit of prep... but I will never go back to the canned casserole. The flavors of this recipe are so rich and fresh!

The original recipe comes from Creative Culinary
(http://www.creative-culinary.com/homemade-green-bean-and-mushroom-casserole-with-fried-onion-strings/), but I have re-posted it here for you with my own pictures. Give it a try and you won't regret it!!


Homemade Green Bean and Mushroom Casserole with Fried Onion Strings


For the Onion Strings:
  • 1 whole Large Onion
  • 2 cups Buttermilk
  • 2 cups All-purpose Flour
  • 1 Tablespoon (scant) Salt
  • ¼ teaspoons (to 1/2 Teaspoon) Cayenne Pepper
  • 1 quart (to 2 Quarts) Peanut or Canola Oil
  • Black Pepper To Taste
  • For the Green Beans:
  • 2 pounds green beans, ends removed and beans snapped in half
  • 6 tablespoons unsalted butter, divided
  • 1 pound button mushrooms, cleaned and diced
  • 1 & 1/2 cup sliced shallots
  • 4 cloves garlic, peeled and minced
  • 1/2 cup dry white wine
  • 1 cup whole milk
  • 1 cup heavy cream
  • 1 cup chicken stock
  • 1/4 cup plus 2 tablespoons all-purpose flour
  • 1 teaspoon Worcestershire sauce
  • 1 teaspoon ground mustard powder
  • Kosher salt and pepper, to taste
  • 1 cup freshly grated sharp cheddar 
      To make the Onions:
  1. Slice onion in half; place the flat half down on your cutting board and slice each half into thin rounds.
  2. Place in a baking dish and cover with buttermilk and soak for at least an hour.
  3. Combine dry ingredients and set aside.
  4. Heat oil in small fryer or large dutch oven to 375 degrees.
  5. Grab a handful of onions, throw into the flour mixture, tap to shake off excess, and PLUNGE into hot oil. Fry for a few minutes and remove as soon as golden brown.
  6. Repeat until onions are gone.
  7. Ree advises to eat them before your family sees them and then repeat the whole process with another onion, because they’ll be really mad they didn’t get any. She is so right...it was hard to not just 'snack' them gone before we even made the casserole!

    To make the casserole: 
  8. Preheat oven to 350°F. Bring a large pot of salted water to a boil. Add beans and cook until deep green and tender, about 10 minutes (we like ours a bit crisp tender; cook longer if you prefer softer beans. (The beans do not continue to cook more in the casserole.) Drain and rinse with cool water.
  9. In a large Dutch oven or heavy pot, melt 2 tablespoons of butter on medium-high heat. Add the mushrooms and sauté until they start sweating liquid, about 4 minutes. Add the onion, garlic, and a pinch of salt. Continue cooking, stirring often, until softened, about 6 minutes. Add the wine and simmer until it evaporates, about 3 minutes. Remove the mushroom mixture to a separate bowl.
  10. Combine the milk, cream, and chicken stock in a large glass bowl and microwave until hot, about 2-3 minutes (or bring to a simmer in a saucepan).
  11. Melt the remaining 4 tablespoons butter in the Dutch oven over medium-low heat. Add the flour and whisk until creamy; about 2 minutes.
  12. Add the hot milk mixture and continue cooking, whisking frequently, until thickened, about 15 minutes. Whisk in Worcestershire sauce, mustard powder, and a generous amount of salt and pepper.
  13. Stir the mushroom mixture into the cream sauce and simmer, whisking frequently, for about 5 minutes for the flavors to marry. Taste and adjust the salt and pepper. (You want this to be on the salty side, because it will mellow once you add the green beans.)
  14. Stir the green beans into the mushroom sauce and toss to combine. Pour the green bean mixture into a large, buttered casserole dish (about 2 quarts). 

z
    14. Bake uncovered for 15 minutes. Add the grated cheddar and crispy onion strings and  
          bake uncovered until cheese is melted, about 15 more minutes. Let stand for 10  
          minutes before serving.
   15. Dig in!

 Notes
We made this for Thanksgiving and it makes a lot; I would cut this in half if serving for a regular meal. Except the onion strings; make them all. You won't regret it.

Monday, December 2, 2013

Simple Bill Tracker

The end of the year is approaching quickly! I have begun to think about next year and how I am going to keep myself organized. This year I am going to revamp my "home-making" binder a bit. I have found so many great printables this year (thank you Pinterest), that I want to do a combination of things that have inspired me. Some of these I have made, and some I have downloaded from other sites. I will post as I go- feel free to use anything that you think might work for you!!

The first sheet is a simple bill tracker. I have had too many instances of a sudden panic attack when I realize I may have forgotten to pay a bill... or two! This takes away the panic so we know exactly what has been and still needs to be paid for the month. There are two sheets, one for January through June, and the other July through December. Everything is in one place! This also allows you to see how your bills have changed throughout the year. If you would like the Excel file to enter your bills electronically, just let me know! This sheet will coordinate with my simple (yet amazing) budget spreadsheet, on which I am adding the final touches. It will be coming soon!

DOWNLOAD HERE


 **Update: I forgot to add the blank template so you can write in your own obligations... HERE it is!! 

Wednesday, October 9, 2013

Week at a Glance

In my years of attempting to be "Super-Homemaker," a combination of Martha Stewart and Betty Crocker, I have figured something out about myself: I am a planner, but not much of a do-er. I can create the most detailed weekly schedule for myself, and never get everything accomplished. I have tried so many different types of planners and organizers that I should have bought stock in Franklin Covey! I have tried programs such as Flylady, and have downloaded so many printables from Pinterest, but spent way more time creating and beautifying my binder than I did using it.

Previous weekly schedules have broken down my chores per day, including a small list to accomplish before going to bed. Everything fit together perfectly to make a master plan for a perpetually beautiful home and amazing meals on the table every evening. However, I failed again. If I didn't get my list done for one day, my perfectionism told me that the week was a bust. It was too much to try to catch up the next day, and there are always unexpected things to throw a wrench in the mix. The guilt grew each day because I wasn't getting enough done for my home and family. Of course I was getting SOME things done, but not enough, and not on the right days (I feel like I am channeling Sheldon Cooper from The Big Bang Theory here). As I write this, I can see how crazy I sound and that it shouldn't be this complicated. And it shouldn't.

After a few months of being home with Little Man, I have decided to simplify my weekly schedule. Knowing that I won't look at 3 different lists, no matter how cute they are, I created a one page list for my weekly housework and meal planning. This Week at a Glance has several elements, but most importantly everything is in ONE PLACE. The plan is to laminate the page and keep it on the fridge. Then as I accomplish things during the day I can cross them off with a dry-erase marker. My goal is to have everything done by the end of the week- however and whenever I can get it done. I have daily goals, but instead of breaking weekly chores down by each day, I will just have a list to work on as I can through the work week. Hopefully a little flexibility and freedom will get me out of my head more and actually doing things that benefit my family and my home.

I have attached my prototype, in case you want to try this along with me. I can change chores, fonts, and colors, so let me know if I can customize something for you! We'll see how this goes! Happy cleaning!

Click HERE to Download

Thursday, October 3, 2013

A New Beginning

I am excited to join the blogging world again! So many life changes have happened since my last blog, and I can't wait to share our new adventure. The biggest change is that we have now realized our dream of me staying at home with our family! I am taking some time off from teaching (which I do love and miss) to be home with our little man. It has only been about six weeks, but the time has already been amazing and invaluable. He has a sibling on the way in February, so timing could not have been better!

We bought a house about a year and a half ago, and have been busy renovating and beginning the lifestyle we have always wanted! My hopes for this blog are to share our journey into homesteading and living the simple life. We have a little over an acre on a beautiful hill (thus the blog title), and we are getting things going!! Our first attempt at a garden was very successful this year, chickens will be arriving in the Spring, and we are working on making more food from scratch! I would love to share any great recipes I find!

I am hoping to sew and craft much more than I have been able to in the past, and maybe even be able to sell some for a little extra income. I have so many projects I want to share... time to get started! Join me!